In this guide, I’ll explain the options available to you for encrypting files using open-source software on a Linux, Mac, or Windows computer. You can then transport this digital information over distance and time, to yourself or to others.
The “GNU Privacy Guard” (GPG) program, an open-source version of PGP (Pretty Good Privacy), allows:
- Encryption using a password.
- Secret messaging using public/private key cryptography
- Message/data authentication (using digital signatures and verification)
- Private key authentication (used in Bitcoin)
First option
The first option is what I will demonstrate below. You can encrypt a file using any password you like. Anyone with the password can then unlock (decrypt) the file to view it. The problem is how to send the password to someone in a secure way? We come back to the original problem.
Second Option
The second option solves this dilemma (how to here). Instead of locking the file with a password, we can lock it with someone’s public key — that “someone” is the intended recipient of the message. The public key comes from a corresponding private key, and the private key (which only “someone” has) is used to unlock (decrypt) the message. With this method, no sensitive (unencrypted) information is ever sent. Beautiful!
The public key is something that can be distributed over the Internet securely. Mine is here, for example. They are usually sent to key servers. Key servers are like nodes that store public keys. They maintain and synchronize copies of people’s public keys. Here is one:
Ubuntu Key Server
You can enter my email and find my public key in the result. I also stored it here and you can compare what you found on the server.
Third option
The third option does not apply to secret messages. This is to verify that a message has not been altered during its delivery. It works by having someone with a private key sign some digital data. The data can be a letter or even software. The signing process creates a digital signature (a large number derived from the private key and data that is signed). This is what a digital signature looks like:
It is a text file that begins with a “start” signal and ends with an “end” signal. In between is a bunch of text that actually encodes a huge number of them. This number is derived from the private key (a giant number) and the data (which is actually still a number as well; all data is zeros and ones for a computer).
Anyone can verify that the data has not been modified since the original author signed it by taking the:
- Public key
- Data
- Signature
The query output will be TRUE or FALSE. TRUE means that the file you uploaded (or message) has not been modified since the developer signed it. Very cool! FALSE means the data has changed or the wrong signature is applied.
Option 4
Option four is like option three, except instead of checking if the data has not been modified, then TRUE will mean that the signature was produced by the private key associated with the offered public key. In other words, the person who signed has the private key of the public key that we have.
Interestingly, that’s all Craig Wright would have to do to prove he’s Satoshi Nakamoto. He does not need to spend coins.
We already have the addresses (similar to public keys) that belong to Satoshi. Craig can then produce a signature with his private key to these addresses, combined with any message such as “I’m really Satoshi, haha!” and then we can combine the message, signature, and address, and get a TRUE result if it’s Satoshi, and a CRAIG_WRIGHT_IS_A_LIAR_AND_A_FRAUD result if it’s not.
Option three and four – The difference.
It’s actually a matter of trust. If you believe the sender has the private key of the public key you have, verification verifies that the message has not changed.
If you don’t trust the private key/public key relationship, the verification is not on the message change, but on the key relationship.
It’s either for a FALSE result.
If you get a TRUE result, then you know BOTH the key relationship is valid AND the message has not been modified since the signature was produced.
Get GPG for your computer
GPG is already shipped with Linux operating systems. If you are unlucky enough to use a Mac, or God forbid, Windows computer, you will need to download software with GPG. Download instructions and how to use it on these operating systems can be found here.
You don’t need to use any of the software’s graphical components, everything can be done from the command line.
Encrypt files with a password
Create the secret file. This can be a simple text file, or a zip file containing many files, or an archive (tar) file. Depending on the sensitivity of the data, you might consider creating the file on an isolated computer. Either build a desktop computer without WiFi components, and never be wired to the internet, or you can build a very cheap Raspberry Pi Zero v1.3, with instructions here.
Using a terminal (Linux/Mac) or CMD.exe (Windows), change your working directory to where you put the file. If that doesn’t make sense, do an internet search and in five minutes you’ll learn how to navigate the file system specific to your operating system (search: “YouTube browsing file system command prompt” and include the name of your operating system).
From the right directory, you can encrypt the file (“file.txt” for example) like this:
gpg -c file.txt
It’s “gpg”, a space, “-c”, a space, then the name of the file.
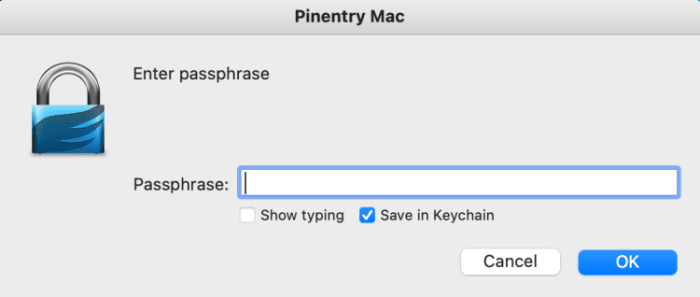
You will then be prompted to enter a password. This will encrypt the new file. If you are using GPG Suite on Mac, note that “Save to Keychain” is checked by default (see below). You may not want to save this password if it is particularly sensitive.
Regardless of the operating system you are using, the password will be saved for 10 minutes in memory. You can delete it like this:
gpg-connect-agent reloadagent /bye
Once your file is encrypted, the original file will remain (unencrypted) and a new file will be created. You have to decide if you are going to delete the original or not. The name of the new file will be the same as the original but there will be a “.gpg” at the end. For example, “file.txt” will create a new file called “file.txt.gpg”. You can then rename the file if you wish, or you could have named the file by adding additional options in the command above, like this:
gpg -c –output MySecretFile.txt file.txt
Here we have “gpg”, a space, “-c”, a space, “-output”, a space, the filename you want, a space, the name of the file you are encrypting.
It’s a good idea to practice decrypting the file. It’s a way :
gpg file.txt.gpg
It’s just “gpg”, a space, and the name of the encrypted file. You don’t need to put any options.
The GPG program will guess what you mean and attempt to decrypt the file. If you do this immediately after encrypting the file, you may not be prompted for a password because the password is still in the computer’s memory (for 10 minutes). Otherwise, you will need to enter the password (GPG calls it a passphrase).
You will notice with the “ls” command (Mac/Linux) or the “dir” command (Windows), that a new file has been created in your working directory, without the “.gpg” extension. You can read it from the command prompt with (Mac/Linux):
cat file.txt
Another way to decrypt the file is to use this command:
gpg -d file.txt.gpg
It’s the same as before but with a “-d” option as well. In this case, a new file is not created, but the contents of the file are printed on the screen.
You can also decrypt the file and specify the output file name like this:
gpg -d –output file.txt file.txt.gpg
Here we have “gpg”, a space, “-d” which is not strictly necessary, a space, “-output”, a space, the name of the new file we want, a space, and finally the name of the file we decrypt.
Send encrypted file
You can now copy this file to a USB flash drive or send it by e-mail. It is encrypted. Nobody can read it as long as the password is good (quite long and complicated) and cannot be cracked.
You can send this message to yourself in another country by storing it in an email or in the cloud.
Some dumb people have stored their Bitcoin private keys in the cloud in an unencrypted state, which is ridiculously risky. But if the file containing the Bitcoin private keys is encrypted with a strong password, it’s safer. This is especially true if it’s not called “Bitcoin_Private_Keys.txt.gpg” – Don’t!
DISCLAIMER: It is important to understand that I am in no way encouraging you to put your Bitcoin private key information on a computer (hardware wallets were created so you never have to). What I explain here is for special cases, under my direction. My students in the mentorship program will know what they are doing and only use an isolated computer, and know all the potential risks and problems, and how to avoid them. Please don’t type key phrases into a computer unless you’re a security expert and know exactly what you’re doing, and don’t blame me if your bitcoin gets stolen!
The encrypted file can also be sent to another person and the password can be sent separately, perhaps with another communication device. This is the easiest and less secure way, compared to option 2 explained at the beginning of this guide.
There are actually all sorts of ways to construct the delivery of a secret message remotely and over time. If you know these tools, think well and carefully about all the risks and scenarios, a good plan can be made. Or, I’m available to help.
Good luck and happy bitcoining!
This is a guest post by Arman The Parman. The opinions expressed are entirely their own and do not necessarily reflect those of BTC Inc or Bitcoin Magazine.